• Can't post after logging to the forum for the first time... Try Again - If you can't post in the forum, sign out of both the membership site and the forum and log in again. Make sure your COG membership is active and your browser allow cookies. If you still can't post, contact the COG IT guy at IT@Concours.org.
  • IF YOU GET 404 ERROR: This may be due to using a link in a post from prior to the web migration. Content was brought over from the old forum as is, but the links may be in error. If the link contains "cog-online.org" it is an old link and will not work.

36mm carburetors

batboy

Guest
Guest
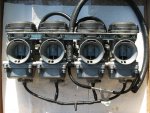
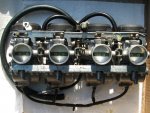
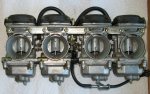
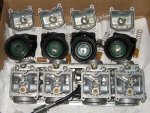
Here's what all the recent carb cleaning practice and parts collecting was leading up to. I'm attempting to rebuild a set of Keihin CVK 36mm carbs that were taken off a 1986 ZX1000 Ninja. If successful, these will eventually be installed on my bike. Yes, I'm batty.

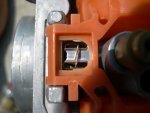
It's always a gamble when buying used parts online. At first glance the exterior is fairly clean. The diaphragm slides seem to be working fine. I noticed when I opened and closed the butterflies, they seem a little sticky as they close. Choke slider seems half stuck. Good lord, the bowl screws are a mess. Half of the heads are stripped and the screws are different lengths with 6 of them being hex heads. I get the feeling this set of carbs will be a lot of work.
 

Attachments

  • 36mm carbs.jpg
    36mm carbs.jpg
    141.5 KB · Views: 324
Hmmmm, Interesting -- By my calculation (always suspect), that should increase potential airflow by 26% or so -- all other factors being equal.  Do the Keihin CVK 36s have accelerator pumps?  I assume the throat spacing is the same as the ZG1000...
 
These are the exact carbs that both SISF, and I were experimenting with back when we got real interested in "hopping up" the ZG... circa 2004-2006... They do not have pumps, nor do they have air cut circuit/diaphragms.
They are large, and are jetted a bit "big" for usage, as they are found. They will also require you to invest the $80 in NEW rear boots to the airbox, believe me, you aren't gonna make the originals "fit"... also, Highly suggested to find some front boots, from the same carbs, to make that tranisition, as the larger diameter there is tight.., along with that, and the actual "front to back dimensions being larger, the "angle" to the intake up front comes into play.. take it from both of us, it is going to wear you down..
Invest in a full set of "murph screws", with the 'tee' wrenches also.. you will be removing, disassembling, and re-assembling them over and over, the socket screws make it much easier.

All I can say is even tho it sounds simple, "jamb bigger carbs on".. it is much more complex to get this all balanced "in the end", as this engine differs from the "high revving" ZX counterpart, thus really can't "use" these carbs "potential"...

Have a blast, but think about this... the "2 minute mod" didn't just pop out of nowhere, and is a direct "opposite" of what is being done with the 36mm's,  Some of us actually went thru the "trials" and found better answers..

BTW, I do have 36's on COGZilla... I often consider putting the 32's back on, or at least dropping back to a set of 34's, from my "stash"
 
I was not aware until I had them in hand that they had no air cut valves. But, I found a post from SISF where he said, "36's are available from the zx1000's, gpz11's (95-96) zrx11's and 12's. All the bore spacings work on the zg head. The zrx carbs have idle cut valves like our 32's, so they can help eliminate the hard decel popping, but I run a set from the gpz, and even w/out the cut valves it's really not a problem."

I have already bought a set of NOS air box to carb boots: 2 each P/N 14073-1273 and 2 each P/N 14073-1274. They came in original factory packaging. I also bought the carb to head holders for the 36mm carbs (knock-offs, not real Kawasaki parts, but they seem to be nice quality). I did not buy a set of Murph's screws, but maybe I should. I do have extra screws thanks to my parts carbs.

* * *

There will be more to come besides the carbs. Think I'll hold off discussing for now, but cams and exhaust have not been forgotten. In fact, I'm convinced the stock Concours exhaust is the biggest performance bottleneck. An engine is basically a pump. It pumps air/fuel in and it pumps exhaust out. Exhaust is the key, mark my words. Who here has one of the better running stock bore and stroke C10s? Jim Snyder because he has a better flowing exhaust system. Funny you bring up the 2 minute mod. That just proves the air intake can outflow the exhaust in stock form. Yeah, the secret is freeing up the exhaust.

* * *

Bad news, I got the bowls off and some ham-handed gorilla has changed jets and they are all chewed up from not having the correct fitting screwdrivers. Main jets are 132 which probably got changed at one time. I think the ZX1000a usually had 130 main jets. Pilot jets are size 35, same as was in the 32mm carbs on the bike. I think it's supposed to have size 38 from the factory. I have an extra set of 38 pilot jets, but no extra main jets, so I'll need to buy some. I will probably start out with 130 main jets and go from there (main jets are size 125 in the 32mm carbs).
 
I took the bike out for a 30 mile ride today. Off and on I've been cleaning the 36mm carbs.

Three of the choke sliders were stuck. The stuck ones could be moved a tiny bit. I was looking up info on how to repair these chokes and found on one of the snowmobile forums a fellow said, "If the choke slider moves even a little bit, smile, because you'll probably get the piston unstuck." I worked the nozzle of WD-40 under the boot and squirted. The piston moved more and more. I sprayed again. I was able to free up all of the choke sliders.

The plugs were still in the low speed tube, so I had to drill them out. Somebody had rejetted the carb, but never adjusted the low speed (pilot) screw. The number of turns was about 1.5, but one was 1.66 and one was 1.25 turns. I hear a lot of people say set the pilot screw at 1.5 or 2 turns. I set mine for 1.5 turns at the moment (bigger carb and bigger jets than my stock setup). Then, let the tuning fun begin.

The sliders cleaned up nicely and the diaphragms were in good condition. The floats look fine. Anyway, the only extra parts I've had to buy so far is 4 main jets (size 132 from partszilla). So, it's starting to go back together. Dang, cleaning and working on these carbs is time consuming. Here's a photo of the suckers torn apart.


Attachments

  • 36mm carbs disassembled.jpg
    36mm carbs disassembled.jpg
    181.6 KB · Views: 181
Float height adjustment and fuel level. I keep confusing myself. The float height is measured with the carbs upside-down with the rack angled down away from you. I guess it should be 17mm and mine are a little over 18mm. So, lowering the measured float height is really raising the fuel level, right? So, to go from 18mm to 17mm I need to bend the tang a bit up or down? My first gut  feeling was up. But, then I started over thinking it.

Yeah, I know that I also need to check levels with clear tubing. At first I was having trouble figuring out how to do that with the overflow tubes in the bowls, But, then I remembered I can use a set of bowls that don't have the overflow tubes.
 
batboy said:
Float height adjustment and fuel level. I keep confusing myself. The float height is measured with the carbs upside-down with the rack angled down away from you. I guess it should be 17mm and mine are a little over 18mm. So, lowering the measured float height is really raising the fuel level, right? So, to go from 18mm to 17mm I need to bend the tang a bit up or down? My first gut  feeling was up. But, then I started over thinking it.

Yeah, I know that I also need to check levels with clear tubing. At first I was having trouble figuring out how to do that with the overflow tubes in the bowls, But, then I remembered I can use a set of bowls that don't have the overflow tubes.

The float tang is resting on the spring loaded float valve plunger. To lower the float height, you want to bend the tab up slightly. This will lower the overall height of the float.

Ideally, the actual measurement needs to be made with the tang just slightly touching the tip of the plunger, but not compressing it. That can get tricky, so most folks just (incorrectly) use the measurement after the plunger is compressed.

Do the overflow tubes keep the bowl drains from still functioning? Bad design if they do. If they don't, the clear tubing scheme should still work.
 
I'm still learning. I thought the overflow tubes were installed into the drain hole. But, now that I look closer, the tube goes into the drain, but there is still a drain hole for the bowl.  Okay, I have that figured out now.

But, the float measurement is still alluding me. I think it's the part about trying to determine when the float is barely touching the needle.. I think I'm trying to measure it incorrectly like everyone else, since I can't even see where it's supposed to touch the needle.

EDIT: MOB's article and other sources I've found say to hold the cards at a 45 degree angle. When I do that I get a little over 18mm. So, I need to bend the tang up?
 
batboy said:
I'm still learning. I thought the overflow tubes were installed into the drain hole. But, now that I look closer, the tube goes into the drain, but there is still a drain hole for the bowl.  Okay, I have that figured out now.

But, the float measurement is still alluding me. I think it's the part about trying to determine when the float is barely touching the needle.. I think I'm trying to measure it incorrectly like everyone else, since I can't even see where it's supposed to touch the needle.

It's going to be on the underside of the tab. Like I said, it's tricky.

I hesitated to say anything about that. Best way is to make a square U-shaped bridge out of some stiff pasteboard or cut it out of a piece of aluminum.  In use, its inverted legs rest on the carb's mating bowl surface, and the height of the inner portion of the "U" is the height you are trying to achieve. With the raised floats resting against the underside of the "U" the tab should just be touching the tip of the plunger.

Or, screw all that and just do it like every one else.
 
I'm just wanting to do the float height as close as I can before doing the tubes and fuel level (which will be more accurate anyway).

Ok, I found part of my problem, I was bending it a tiny bit each time since I was afraid to break it or bend it too far. I read several notes that caution to do it in small increments. Turns out it wasn't bent enough (at least they were small increments). Think I'm finally getting into the ballpark. I got two at 17mm now.

UPDATE: I'm still having trouble seeing the top of the needle even with additional light and a magnifying glass. Sucks to get old. But, I have the floats set at a tad over 17mm on all the carbs. I need a break. Going to run to town and get some fuel line and some things for another project.
 
batboy said:
I'm just wanting to do the float height as close as I can before doing the tubes and fuel level (which will be more accurate anyway.

Ok, I found part of my problem, I was bending it a tiny bit each time since I was afraid to break it or bend it too far. I read several notes that caution to do it in small increments. Turns out it wasn't bent enough (at least they were small increments.. Think I'm finally getting into the ballpark. I got two at 17mm now.

Good, and FWIW, what a commercial bike float level gauge looks like:

Img_4969-L.jpg
 
Thanks Guy,
you popped that up as i was "doctoring" a picture to show the "home made cardboard cutout" method, which works perfectly, and is free...
I attached it any ways.

B/Boy,
as for the float contact with the plunger tip, every float needle plunger spring differs, some are mushy, some are extremely stiff, this is why the 45* angled "measurement" directive comes into play, with the "tang" resting on the plunger tip, that internal spring reaches a "happy point" in its compression, and making all the carbs equal, with that method works.. it does need to rest on the plunger tip... when the carbs are inverted, and fuel is in the bowls, and floats are "floating", that spring pressure helps to keep a consistant pressure to seal the leedle, when the bike is bouncing around being ridden. It is also being pressed upwards by the "flotation" of the floats themselves.
Giving "complete carb education/lessons" online, in step by step, increments, to people that really have little idea on how this stuff all works, even when they have carbs in hand... id not something I am willing to do anymore.
The article I wrote, is just a ""basic primer"", on what's involved, and seems to be taken as "everything you need"...
which is bad, as it is about 3% at best, of the knowledge required to "analyze/combine parts/repair" CV carbs..

People take it a bit too literally... It's good you are experimenting on something other than the good carbs from your bike, but some of this stuff I'm reading simply makes me shake my head, especially the part about "switching float bowls in order to utilize the bowl drain" to ascertain fuel level... you have drains in the ones with the overflow tubes.. This is kinda what I say about "a little knowledge" is a bad method to follow, there needs to be much more understanding of how these carbs actually function, before substituting parts, and modifying parts. I visit here to offer assistance, but not to "give classes", I could earn money for that, or I could earn money by doing carb "refurbish/repair", which I don't do as we have someone already willing to do those.. and I'm not going to steal his "bread and butter" as that is his income.

things like this:
batboy said:
I'm just wanting to do the float height as close as I can before doing the tubes and fuel level (which will be more accurate anyway).

UPDATE: I'm still having trouble seeing the top of the needle even with additional light and a magnifying glass. Sucks to get old. But, I have the floats set at a tad over 17mm on all the carbs. I need a break. Going to run to town and get some fuel line and some things for another project.
really make me scratch my head...
 

Attachments

  • rotated float GAGE pic.jpg
    rotated float GAGE pic.jpg
    27.4 KB · Views: 139
  • Carb_float_needles__1_2_002.jpg
    Carb_float_needles__1_2_002.jpg
    83.9 KB · Views: 146
MOB, I'm definitely a guy that flies by the seat of his pants. This annoys the methodical and meticulous. Sorry. Thanks for your help. I really do appreciate it. Don't give up on me. I might surprise you. One of the first things I did to this bike when I bought it was to convert to  a Mean Streak 17" rear wheel. Yes, this has been done countless times, but I went a step farther and converted the Mean Streak rear brakes in a different manner than anyone else had previously done. Maybe I ain't a total basket case?
 

Attachments

  • Ninja Edition.jpg
    Ninja Edition.jpg
    317.3 KB · Views: 147
Rich:

"Thanks Guy,
"you popped that up as i was "doctoring" a picture to show the "home made cardboard cutout" method, which works perfectly, and is free...
"I attached it any ways."

I was doing so many carbs there for awhile, that making gauges for each of the different varieties was getting simply impractical. The adjustable one from Pit Posse took care of that little issue.
 
I got the carbs assembled and first thing tomorrow morning I will bench test them with gasoline to make sure they don't leak, check that the needle shuts flow off, and to check fuel level in all 4 carbs. We'll see how bad I am at setting float height. I have the feeling it'll take half the day to get the levels the way I want. I'm learning a lot, like I don't want to do this kind of carb work too often.

UPDATE: I set the carb rack up on some scrap 2X4s and leveled it. I used a plastic squeeze ketchup bottle to fill the bowls with gasoline (stuck squeeze bottle snout into fuel hose). No leaks and all the needle valve work fine. The fuel level was perfect in two of the carbs, maybe 1mm low in one and 2-3mm low in another. So, not bad for my first time. I really thought I had nailed the float heights, but it is indeed tricky to setup. Oh well, I have all morning to get the levels exactly right.
 
I tweaked the float height on the two low ones. Next test showed 3 in a row looking perfectly level. One stubborn little piggy was still 1mm too low. I tweak it again and tested. Good grief, now it's a 1/2mm too high. Another nudge and the fuel levels in all four carb bowls are identical. I even held up my framing level to make sure. Yep, perfect. When I measure the float height with the bowls off, I now get precisely 17mm. The overflow tubes are 8mm above the fuel level. Yippee! and Whew! That was time consuming.

I was notified today that the main jets (size 132) were shipped. I believe OEM was 130, but those were out of stock, so I got one size bigger than stock. I'm assuming it'll be pig rich. I'd rather the bike be a  be a bit fat than too lean. The pilot jets will be 38 (from the Voyager 12 carbs I parted out) and I found specs on the  ZX1000 Ninja. The pilot screw was set to 1.5 turns by me, but specs say 2.5 turns. Think I'll compromise at 2 turns for initial start up. That's about it.
 
batboy said:
UPDATE: I set the carb rack up on some scrap 2X4s and leveled it. I used a plastic squeeze ketchup bottle to fill the bowls with gasoline (stuck squeeze bottle snout into fuel hose). No leaks and all the needle valve work fine. The fuel level was perfect in two of the carbs, maybe 1mm low in one and 2-3mm low in another. So, not bad for my first time. I really thought I had nailed the float heights, but it is indeed tricky to setup. Oh well, I have all morning to get the levels exactly right.


I went through the enjoyable task of setting up a single CV40 on a couple of bikes… jets, needle, back to jets, slide, back to needle – was amusing at the time, but I can’t imagine trying to do it with four carbs and keep everything breathing together – afraid that is too much brain-strain for me…  am enjoying reading about it tho’  ::)
 
This endeavor was definitely time consuming and required patience. Lots of steps can end in failure if you're not careful. Having the proper tools helps a lot. I spent more time researching how  to do things than actually working on the carbs. I got stuck a couple of times, but COG members helped me out and got me pointed back in the right direction. Folks, if I can do it, you can do it.

I spent a couple hours last night bench synchronizing the carb rack. I bought marine grade stainless steel M4 x 14mm long allen head cap screws for the float bowls and the same size in black anodized for the tops. Think the hardware cost about $10 total.

I spent $300 on the following: 2 spray cans of Gumout Carb Cleaner, used ZX1000 carburetors, junk Voyager parts carbs (provided bowls with overflow tubes), new airbox to carb boots, head to carb boots, carb rebuild kits, new fuel line, and 4 X main jets (plus extra parts for another future rebuild).

One thing that is sort of a minus regarding the Voyager 12 bowls with overflow tubes, is the fact all the drain plugs face the same way. Our Concours have two facing left and two facing right to make it easer to get a tool in there. But, a long T-handle ball tip allen wrench will reach, so no worries. But, you might need to add that to the budget.

I had several PMs expressing interest in this thread. Thanks for all the encouragement and support. I still have more work to do and lots of tuning. But for right now, I think it's time for a bike ride. MOB says I should be riding not wrenching. Maybe I can do both?
 

Attachments

  • 36mm carbs rebuilt 1.jpg
    36mm carbs rebuilt 1.jpg
    166.2 KB · Views: 137
  • 36mm carbs rebuilt 2.jpg
    36mm carbs rebuilt 2.jpg
    164.7 KB · Views: 210
Top