• Can't post after logging to the forum for the first time... Try Again - If you can't post in the forum, sign out of both the membership site and the forum and log in again. Make sure your COG membership is active and your browser allow cookies. If you still can't post, contact the COG IT guy at IT@Concours.org.
  • IF YOU GET 404 ERROR: This may be due to using a link in a post from prior to the web migration. Content was brought over from the old forum as is, but the links may be in error. If the link contains "cog-online.org" it is an old link and will not work.

First valve adjustment

jerrylking

Member
Member
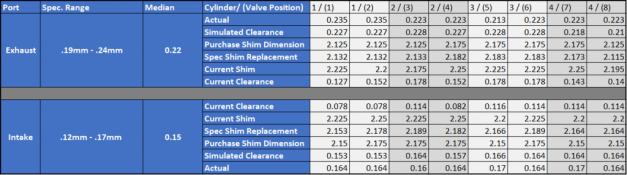
I have a 2009 non-ABS C-14 that just turned over 25,000 miles. It runs great, so I'm wondering if a valve adjustment really is necessary. If so, I'm seeking advice on what to do and not to do. I'm mechanically adept, but I've never adjusted valves that require shims before. I see that Murph's Kits offers a parts kit--is that the best way to go? Any advice appreciated.IMG_3937.JPEG
 
Yes check em for peace of mind. Buy the Murphs kit with the plugs for peace of mind.. Get the shims once you figure out what you need from Rocky Mountain ATV as you can get half sizes. Have a good set of torque wrenches on hand in INCH and FT lbs. They're probably more threads on this topic here than what brands of oil and tires combined lol. Search function is awesome. Lots of great people here that will answer questions as well..
 
It will eventually need to be checked and most probably adjusted. I bought an 08 with 50,000 miles. I ASSumed it hadbeen maintained because it had lots of nice farkles but I was wrong. I checked it at about 75,000 and 12 valves were tighter than spec.
 
Mine at ~30K miles 15/16 were tighter than specification, needs to be done.

Get a FSM, read up on the job (FSM), as mentioned by
earching here and then set aside a handful of days for some zen time tearing apart your machine.

The job is not difficult but is tedious and no short cuts are advised.

Get the oil passage pipe o-rings too, after reading manual you’ll know which ones they are.
 
I've done a number of these and in all cases the valves are tight. I recently did one that had 15 of the 16 valve tight. So yes, you should check and adjust the valves to help ensure that your engine lasts as long as possible.

In my experience future valve checks show very little change from the first one. I suspect that you get most of your change in the first interval and after that things slow down a lot. There may be a point at high mileage where things start moving again but I'm not sure where that might be.

The biggest concern, apart from some performance degradation, is the exhaust valves. When too tight they don't transfer heat to the cylinder head and will get hotter than they should. This can cause burned valves over time.

Personally I would not ever trust the dealership to do this properly. Labor-wise it's a good 8 hours of work and dealers just can't keep a mechanic tied up that long for what they charge. It's really not as difficult as it appears. For most the tools are the biggest hurdle. Nothing really special needed but you do need to have them. The Murph's Kit has everything you need from a supply perspective EXCEPT the shims themselves. You will find that your dealer will not ever have any. I've had the best result with Jake Wilson (now Rocky Mountain ATV) and their ProX shims. They show their stock online and ship fast.
 
I had the valves on my 2010 checked/adjusted at 25k miles. The bike was running pretty good too. A few of the exhaust valves were tighter than spec and I think one or two intakes. Valves adjusted, changed the spark plugs, air filter and synched the throttle bodies and the engine just purred! Even at start up after the adj was done you could hear a difference in the smoothness. Along with the valve adjustment you should also install the new cam sensor o-ring available from Murph's to fix a well known oil leak. Once you get that initial "break in valve adjustment" done they seem to stay in spec for a lot longer.
 
I have a '08 C-14 I bought used a few years ago with 16K miles on it and it was running great, too. I checked the valve clearance at 18K miles and 2 intakes were in spec but just on the low end, and all but a few of the exhausts were below specs ( tight ). I set the two "tight" intakes in the middle of the range - all the intakes are now in the middle of the range and set all the exhausts at the high end of the range.

So, if I was you, I would check the clearances even tho your bike is running great. This was the first bike with shims that I needed to adjust the clearances. It's not that hard to do if you are mechanically inclined and have a micrometer to measure the old shims with. The camshaft gasket was still in good shape so I just coated it with silicone sealer and re-used it. I replaced the exhaust cam position sensor O-ring and checked the tightness of the exhaust pipe clamps. I also cleaned the reed valves in the exhaust gas valves.

I wouldn't buy the shim kit. You can get a better variety of shims from Rocky Mountain ATV ( cheap ):

https://www.rockymountainatvmc.com/parts/pro-x-valve-shim-p

Also, this attachment may be helpful :
 

Attachments

  • 2008AirDamInstall.pdf
    63.5 KB · Views: 203
Last edited:
Other things you'll need:

1) A good set of feeler gauges. Not the typical hardware story type, those don't have enough gauges. I've had good results with this (or a similar) set:

Feeler Set

2) Torque wrenches. I've found that you need 3, a 1/4", 3/8", and a 1/2" drive.

3) A magnet to pull the buckets out of the cylinder head. A cylindrical style works best.

4) A place where you can have the bike for up to 2 weeks without having to move it. You can do the job in 2 full days but you'll have to wait in between while you order shims. So it'll end up taking a week or so.
 
I was using a telescoping magnet but it got kind of cumbersome, wasn't strong enough, slippery and was scratching the bucket a bit. Then I found a magnet on the fridge that was shaped like one of those toy decoder rings lol. Smallish diameter flat yet round magnet that had a ring holder on top. It worked perfect!
 
Also - IMO, don’t try to cut corners…. The cams come out, period. You’ll find some videos online of others tilting opposite of the timing side of the cam up, asking for trouble.. Drop a cam (dent something), lose a shim (really screwed now)..

I again followed the FSM and used moly assembly lube - would suggest the same.

Egg cartons work wonders for organizing everything. Attached a spreadsheet I used to organize my measurements, calculations for shims then final measurement.
 

Attachments

  • 1613527982896.png
    1613527982896.png
    241.1 KB · Views: 231
Here are links to a threads I started that has the part numbers and tools you need for the job and led to Murph's Kit's carrying the supplies.


Also, if you want to search this forum properly, paste this string into a Goggle Search (anything typed after the / should pop a result right up for you)
Example: site:https://forum.concours.org/ valve adjustment
 
I did mine at 35k and am now at 76k. I set them all at the large end. Debating on if I should check them again this winter.
 
I did mine IIRC at 13,800 miles and adjusted 15 of 16 shims. I checked them again at 40K and they did not tighten except two intakes loosened a small bit. I think you would want to at least check one more time so you know for sure. I'm now at 75,000 miles and wondering myself if I should check a third time.
 
I did mine IIRC at 13,800 miles and adjusted 15 of 16 shims. I checked them again at 40K and they did not tighten except two intakes loosened a small bit. I think you would want to at least check one more time so you know for sure. I'm now at 75,000 miles and wondering myself if I should check a third time.
Fred Harmon found many of my exhaust valves tight at 75K, after having valves checked/adjusted (if needed) at ~25K and ~50k.
 
Mother Kawi states non-US models, if I recall properly, mid 20’s K miles.

I would say good timing is 17K - 23K miles for that first check.

Totally a gut instinct from what I witnessed on my machine personally and reading of others experiences.
 
One thing to note. Kawasaki uses some strong loctite on the frame bolts and stay bolts. They were difficult to remove and i fought them the whole way, I should've just heated em up but didn't bother... Instead of just jamming the bolts back in I used a thread chaser and cleaned all the bolts and their boss. During reassembly I just used Blue loctite and they all went in smooth. Probably took me an hr or so just to prep everything.
 
One thing to note. Kawasaki uses some strong loctite on the frame bolts and stay bolts. They were difficult to remove and i fought them the whole way, I should've just heated em up but didn't bother... Instead of just jamming the bolts back in I used a thread chaser and cleaned all the bolts and their boss. During reassembly I just used Blue loctite and they all went in smooth. Probably took me an hr or so just to prep everything.

A driver like this one (or similar) will make quick work of those frame bolts. Yes, they have "red" threadlocker but it's not red loctite. It's some other product that is more like blue loctite. Impact does the trick for me though.
Screen Shot 2021-08-10 at 7.41.49 PM.png
 
A driver like this one (or similar) will make quick work of those frame bolts. Yes, they have "red" threadlocker but it's not red loctite. It's some other product that is more like blue loctite. Impact does the trick for me though.
View attachment 30130
Thanks.. I have a 3/8 cordless impact but didn't feel the need for it. It was in the garage with my auto tools anyways. My bike is in the shed with it's own set of tools lol
 
My only advice is to organize all the pieces and fasteners so you know where they all go upon reassembly. And take lots of pictures. Take more than you think you need...and then take a few more.
 
A question for anyone who's done this on a 2010-up C14:

Do the throttle bodies have to be loosened/removed to get at the intake cam position sensor and remove it? Getting ready to remove the stick coils (and probably the radiator while I'm at it) si I thought I'd throw the question out to the board. I don't recall having to remove them on my '08 when I checked its valve clearances.
 
Service manual states differently, though I'm going to get at the bike in a few to see what's what.
Are you talking about a throttle sync or removing the throttle bodies? I went thru my valve adjust without either and all was good on my 2011.
 
Valve adjustment. 2012.

Service manual states that to remove the camshaft cover, one must remove the intake cam sensor. Electrical chapter states that to do this, the throttle bodies must be moved out of the way.

I just got enough of the thing apart to verify this isn't the case at all. There's pieces of C14 all over my garage at the moment but we're getting to the point that the cam cover can be removed.
 
For the next challenge:

Anyone know of a good way to get the stick coils out without damage to said coils or to other motor parts? All of mine turn freely but I cannot break them free in the vertical sense. Slight pressure with a non-metallic wedge isn't doing any good either.
 
Of course, as soon as I posted the above I got them loose. 🤪

The intake camshaft sensor...I now know why the manual calls for throttle body removal to remove the part. Seems the wires are positioned between the #1 and #2 throttle body boots. Pure genius on someone's part when replacement time comes, but removing the sensor to get the valve cover off is straightforward.

I'll probably pull the valve cover tomorrow and start checking clearances. It's nice to work in that area with the motor mounts and radiator removed.
 
Mother Kawi states non-US models, if I recall properly, mid 20’s K miles.

I would say good timing is 17K - 23K miles for that first check.

Totally a gut instinct from what I witnessed on my machine personally and reading of others experiences.
Both of mine were checked at slightly less than 15k on the clock.

Going from memory, my '08 required 8 valves to be adjusted; none were overly tight but they were getting towards service minimums. I was able to swap shims around and ended up having to buy just a few.

My '12...14 of 16 require attention. Intakes for #1 are in the middle of their range so they're being left as-is. One of the intakes for #3 measured .0035. Every other valve requiring attention was at or slightly below specified service minimums. Swapping them around helped...still ended up ordering 6.

I now have two data points for initial checks, and based on these data I would not advise running the bike for thousands of miles past the indicated service interval.
 
A question for those of you who have done things with thread-lockered Kawi bolts:

I always clean my bolts and threaded holes before reassembling the parts - particularly if they've had any locking agent applied. A few days ago I got around to chasing all the removed bolts with dies; today I used taps to chase the sub-frame and engine hanger mount holes.

The two cylinder head bosses are M10x1.25. I carefully threaded that size tap through the left one and noticed that a bit of material had been removed. When I threaded the bolt back in, it wiggles slightly. Not "sloppy" but you don't need a wrench to turn it in.

The right hand boss only had a little of the tap inserted. You still need a ratchet and Allen bit to run its bolt in, though.

Will that left boss now hold its bolt at 44 ft/lbs of torque without damage to the remainder of the threads, or did I screw the pooch here? Start looking for a longer bolt w/ lock nut, Time-Sert the thing, ?

FWIW, every 8mm x 1.25 hole in the frame bosses also appears "tight" with regards to threading so I didn't chase them out much beyond the first few threads.
 
Same here John cleaned bolts / bolt holes before assembling as leaving all that crud in there proper torque cannot be measured.

I would not be overly worried - bolt it all together at specified torque. If you have a problem you are going to know right away. I wouldn’t go causing a problem if there is not one. I too felt the same looseness on a couple bolts - I do believe Kawi went a little nuts on the lock-tight…
 
Funny thing is...thinking back to when I did my '08, I didn't have to go through such shenanigans when removing the engine hangers. Actually had to get Mr. Torch on the '12's two M10 bolt heads for a bit of time, as there was no way they were coming loose as-is without damaging the Allen bit. This with a 1/2" dr, 2ft breaker bar...
 
John- i wouldn't be too concerned unless you can't tighten them to specified torque values. I posted earlier in the post what i did as i took others advice and have removed said material from items myself before. I sourced a set of thread "chasers", they clean threads rather than cut new threads.
 
John- i wouldn't be too concerned unless you can't tighten them to specified torque values. I posted earlier in the post what i did as i took others advice and have removed said material from items myself before. I sourced a set of thread "chasers", they clean threads rather than cut new threads.
I did a test this morning with the left side. Took it to specified value (44 ft/lbs), loosened, repeated. No issues.

One thing I did notice is that the OEM fastener leaves about 8mm or so of the threaded casting boss unengaged - too short. That's roughly 25% of the holding power of the casting which isn't being utilized. On a whim I'd ordered a couple of M10-1.25x55 shoulder bolts "just in case" and I think these are going to be used to replace the stockers on both sides of the motor.
 
Last edited:
Caution: Using a magnet on the shims can magnetize them causing filings to collect on the shims and accelerate cam lobe wear. Have you ever seen what collects on a magnetic drain plug? Do you want that on your shims? If you use a magnet to remove the shims you need to demagnetize them prior to reuse.
 
Have to say this is the first time I ever heard of magnetized shims being an issue. I'll have to think about that one, since anything is possible. My first thought is it would hold the bucket and shim to together and can't imagine any filling getting between the bucket and shim anyway.
 
While we're breaking stuff in, opinions on the preferred lubricant for the freshly cleaned cam lobes and buckets? FSM calls for an application of moly oil between thenm prior to startup...I have Lucal Oil Treatment available and can get moly-bearing cam break-in lube.

The bike won't be ridden on the break-in stuff. It's due for an oil change, so any startup lube is going right back out the drain hole as soon as proper engine operation (including radiator fan cycling) is verified.
 
Its already broken in as long as you put the buckets back where they were. IMO unless you're breaking in an engine or its going to sit for a extended period of time i would and did use motor oil. (The same i normally use for maintenance)
 
While we're breaking stuff in, opinions on the preferred lubricant for the freshly cleaned cam lobes and buckets? FSM calls for an application of moly oil between thenm prior to startup...I have Lucal Oil Treatment available and can get moly-bearing cam break-in lube.

The bike won't be ridden on the break-in stuff. It's due for an oil change, so any startup lube is going right back out the drain hole as soon as proper engine operation (including radiator fan cycling) is verified.
I use Lucas Moly assembly lube. Same deal run it up to operating temp, burp the cooling system, a few cooling fan on/ off cycles then dump the oil for fresh oil/ filter

It is some gooey green stuff that stays in place well, doesn’t drain off and becomes mega slick after compressing. Would not ride it though, think could be a problem for the clutch, although is it not the same stuff used at the factory?

I try to follow for FSM on these recommendations although i can see the validity of Chris’s comment as well.
 
While we're breaking stuff in, opinions on the preferred lubricant for the freshly cleaned cam lobes and buckets? FSM calls for an application of moly oil between thenm prior to startup...I have Lucal Oil Treatment available and can get moly-bearing cam break-in lube.

The bike won't be ridden on the break-in stuff. It's due for an oil change, so any startup lube is going right back out the drain hole as soon as proper engine operation (including radiator fan cycling) is verified.
Any auto parts store will have moly-based assembly lube.

Lucas Assy Lube
 
Got the shims in last week - ran the buckets and the shims I'll re-use through the demagnetizer and checked each as I went. That thing is pretty slick.

Everything is back together and clearances checked. Going to add a little more start-up lube to each cam lobe then put the valve cover on, hang the radiator and start putting the electrical stuff back together.
 
Another bump - specifically for Fred and others who have done a lot of valve checking:

The FSM calls for the right front engine mount to be removed in order to gain access to the valve cover. I removed both left and right, along with the radiator and a bunch more things in the way of hands which are two sizes too big to get in there. The right one lines straight up, but when held flush to the motor and frame the left was about 1/3 a hole diameter off for any one of the three holes - with the other two lining up correctly. I was able to get all the bolts started true in their holes by holding the mount as far away from the engine and frame as I could then alternated between them as I tightened a bit at a time. The mount "popped' slightly into place as the top two were being set to final torque, but didn't when the 10mm engine bolt was torqued.

Question: How bad did I screw myself/the bike by taking that left mount off? Note that none of the other engine retention fasteners apart from the ones that hold the front brackets in place were touched.
 
I have no experience with this issue. I believe the reason why the FSM does not call for the left mount to be removed, is because it's needed to hold the engine in the correct position. You might want to review the steps for removing (and more importantly) installing the engine to make sure you have the engine positioned and torqued properly. You may need to loosen some other engine mount bolts and start the torque sequence from scratch.
 
I have no experience with this issue. I believe the reason why the FSM does not call for the left mount to be removed, is because it's needed to hold the engine in the correct position. You might want to review the steps for removing (and more importantly) installing the engine to make sure you have the engine positioned and torqued properly. You may need to loosen some other engine mount bolts and start the torque sequence from scratch.
Did the whole thing from start to finish...loosened the nuts and collars, eased strain on the engine...etc. Things just lined up this time. (y)

It took me longer to decipher the procedure than it did to actually perform it. (Yeah, I've written technical procedures for a living and taught the servicing that goes with them. The diction in that section needs help.)

Lesson: Left engine mount is the initial datum point. You'd think a cautionary note would be included at various places throughout the FSM...
 
I took both mounts off. Engine didn't budge. I did put a small jack under the oil pan just in case. Both lined up fine when I went to reinstall. The actual engine mount re-torque procedure looks like a headache. I just cleaned threads, added loctite, torqued the left and right to appropriate spec and called it a day. It might be just me but i think the infamous 4k buzz got better.
 
Another bump - specifically for Fred and others who have done a lot of valve checking:

The FSM calls for the right front engine mount to be removed in order to gain access to the valve cover. I removed both left and right, along with the radiator and a bunch more things in the way of hands which are two sizes too big to get in there. The right one lines straight up, but when held flush to the motor and frame the left was about 1/3 a hole diameter off for any one of the three holes - with the other two lining up correctly. I was able to get all the bolts started true in their holes by holding the mount as far away from the engine and frame as I could then alternated between them as I tightened a bit at a time. The mount "popped' slightly into place as the top two were being set to final torque, but didn't when the 10mm engine bolt was torqued.

Question: How bad did I screw myself/the bike by taking that left mount off? Note that none of the other engine retention fasteners apart from the ones that hold the front brackets in place were touched.
I too take off both mounts - however - only take the left off after my manhandling of removing parts has been completed and reinstall before I start adding weight and dropping parts in place. The amount of force needed to seat parts like the stick coils I was concerned may apply unacceptable strain on the aft mounts.

I have never had an issue with alignment of the engine mounts or sub frame brackets.

Glad all appears to have worked out.
Here's the funny thing:

The left front of the engine appears to have been canted upward by 1/4". If I was pushing down on the stick coils or other parts with sufficient force, you'd think the displacement would have been downward.

It's been several years since I did the valves on my 2008, but as I recall I took both mounts off it yet experienced no problems with alignment there either.

When you actually perform the engine hanger tightening sequence, it becomes a "Doh!" moment. The manual makes it out to be much more difficult than it is.
 
It's amazing how much smoother the engine runs without a tight intake valve.

One of mine (#3) was .0035". All the intakes are now in the .0055-.0065 range and I tried for .008 on the exhaust side. This thing now comes down from cold idle just the way my '08 does, and throttle response tested under static conditions is instant.

Oil and filter change now, then I have some repairs to make to the upper fairing pieces where the Well Nuts don't seem very well. Their molded bosses tend to crack for whatever reason.
John were you able to detect an increased compression when rotating engine over manually - final clearance check?

Next one I do I’ll measure compression before / after.

I have always noted an increased compression, of course each one was on far side of spec or out of spec and leaking compression.

Expect you’ll be happy with the final performance result 👍 !
 
John were you able to detect an increased compression when rotating engine over manually - final clearance check?

Next one I do I’ll measure compression before / after.

I have always noted an increased compression, of course each one was on far side of spec or out of spec and leaking compression.

Expect you’ll be happy with the final performance result.
Yes, the motor is definitely harder to turn over after the clearances were set to reasonable figures.

Makes me wonder how tight this thing was from "the factory", and elsewhere on the forum I'd posted my experiences with screwy idle. That issue is now gone. I didn't do a throttle body sync - that will probably be done at 30k. Same with my '08 - I did the valves at 15k, didn't touch the throttle bodies and it's still extremely smooth at 22k.
Recently performed a valve sync for another COGGER, member purchased C14 used and never ran perfect - now it’s as you report full pull, sweet and smooth!

Good feeling to see smiles!

Not many realize the amount of performance that can be gained with this critical maintenance item. C10 the same…

Glad yours has turned out to your liking!

Wayne, Carol & Blue
 
The engine should be supported underneath with a jack anytime you remove the front engine mounts. I place the jack so that it is just starting to want to lift the front wheel off the ground, this way I know that the weight of the engine is resting on the jack.

I don't like to remove the left engine mount because the aluminum threads on the lower left engine mount get stripped out easily when re-torquing. This is due to the shallow depth of the boss on the left side that the lower bolt threads into. You have to be very careful with it or it will strip out. I avoid this problem by simply not removing the left mount, and you really don't need to anyway. The right mount has deeper thread socket, so it doesn't suffer from this issue.
What do you do in case of a strip-out...longer bolt and nut, Time-Sert, ?

(TS is probably what should have been done from the factory, but the bean counters have final say I guess.)
 
TS or Heli Coil are your only good options when the threads strip out. I suppose you might be able to use a longer bolt and nut on the back side, but I've never tried it. The best thing is not to remove the left side engine mount if you don't have to.
 
The best thing is not to remove the left side engine mount if you don't have to.
My big hands don't fit in the confined spaces very well unless I do, but I'll remember this in the future. I did replace both bolts with 50mm versions (allowing engagement of all the threads) and will leave things in place unless absolutely necessary to remove.
 
I use a high quality digital torque wrench on camshaft cap bolts due to the low torque settings needed. I don't like to use mechanical torque wrenches on low value torque bolts.
 
Found something that'll go on my Christmas list:

AC Delco 1/4" digital

They also have 3/8" and 1/2" drive units. My clickers have maintained calibration since new (many years and counting) but I may upgrade to a set of AC-Ds and keep the others as backups.
 
My current 1/4 and 3/8 ‘clickers’ have worked well for me. Never tried a digital.

I did have one 1/4” ‘clicker’ that ceased on me a few years ago, I always exercise mine before use, would have been catastrophic as was a sensitive torque spec…
 
My current 1/4 and 3/8 ‘clickers’ have worked well for me. Never tried a digital.

I did have one 1/4” ‘clicker’ that ceased on me a few years ago, I always exercise mine before use, would have been catastrophic as was a sensitive torque spec…
I did a little reading and calibrated mine last night. 1/2 was right on but my 1/4 was a little light
 
Top