• Can't post after logging to the forum for the first time... Try Again - If you can't post in the forum, sign out of both the membership site and the forum and log in again. Make sure your COG membership is active and your browser allow cookies. If you still can't post, contact the COG IT guy at IT@Concours.org.
  • IF YOU GET 404 ERROR: This may be due to using a link in a post from prior to the web migration. Content was brought over from the old forum as is, but the links may be in error. If the link contains "cog-online.org" it is an old link and will not work.

I bought and revived a Concours and made it into a video for your viewing pleasure

stardude9002410

Guest
Guest
Hey everyone!

I haven't seen many videos documenting the full revival of these bikes (at least not in HD) and just wanted to post my take on it. It's definitely a longer one at over an hour, but if you enjoy Vice Grip Garage or Watch Wes Work style videos, this will be right up your alley. I also rebuilt an EX-500 a year ago and had a lot of fun with it, so wanted to tackle another one.

I'm much more active on reddit, so I polled there to see what a good touring bike would be. The bikes I have are much more suited for shorter cruises, so I wanted something better fit for longer cruises. I settled on this 2000 Kawasaki Concours which I picked up for $2k.


The bike was in okay shape to start with, but it needed the following major things to be addressed.

  • Needed the Carbs cleaned / minor rebuilt - This was a bit of a pain just knowing how difficult it was removing / installing the carbs on my EX-500, so I knew heat and lube was gonna be my friend. Cleaned up all the jets real nice and after installing, no issues with idle or throttle response.
  • Rebuilding the front / rear brakes and calipers - My goodness these were really bad. Both sets of calipers had basically completely locked up. It took a lot of effort and patience to get the pistons out (mainly brake cleaner and an air compressor), but once they were I was able to get everything cleaned off and the seals replaced. If you wind up doing this, you can avoid a lot of fluid draining out of the line by sticking a vacuum line plug into the line (like how the banjo bolt would go in).
  • Oil / Coolant drain and swap - This one is pretty straight forward, but wanted to mention that Autozone carries the filter as this STP S6012 filter. It doesn't show as compatible on the Autozone website, but in store they have it listed as compatible. Side note, not sure why but the engine only took 2 quarts of oil instead of the 3 that the manual says. Hmmm... Also, the bike had almost no coolant in it. The guy said he added a switch to manually turn the fan on to keep it cool in stop and go traffic, and I think I know why now. Why he didn't just add coolant is beyond me...
  • Grease the appropriate joints - This one is pretty straight forward. Just find the grease zirks and grease 'em on up.
  • Remove and replace / balance the front and rear tires - This sucked, kind of a lot. Not because it was overly difficult, but because there are a lot of conflicting opinions on how to remove the rear tire. A number of people use a method of propping up the center stand on a 2x4 (but this comes with a set of issues like people saying you need to ratchet strap the center stand to keep it from falling forward, and in my opinion just doesn't seem very stable). The manual just says "oh yeah, remove the axle and pop the wheel out to the right". Did they even notice the mufflers are completely in the way? Dumb engineers... Anyway, I go over it in the video, but you can remove a lower bolt on the shock, let the rear wheel drop, pull the wheel to the right (to disengage from the final drive), and then remove the 4 final drive bolts to remove it so you can get the tire out. Honestly, this was probably the easiest way to do it (for me) without having to do any other sketchy stuff. After getting them off, I had called around to a bunch of local tire places (dealer and small businesses) and none of them would mount and balance the tires for anything less than like $100 per tire. I ordered some tire irons off Amazon and did them myself. Heat is definitely your friend here, as I had trouble getting the bead to mount on the front tires. I wound up using a Shinko 777 150/80-16 on the rear and a Dunlop Roadsmart 3 110/80-18 on the front. Both tires are MUCH better than the original ones on the bike, which were over 13 years old. Balancing the tires was pretty easy. Throw the axle in a vice or on some jack stands and spin until you find heavy spot and add weights. Lots of videos on youtube for this.
These were the main things, but also did a clutch fluid bleed, cleaned up all the panels, cleaned off the seat, fixed the auxiliary lights the previous owner installed, clean out the airbox, etc...

Some things I still have to figure out.

  • Tons of wind over my helmet - Apparently this is a common issue on the stock Windshield. I don't really feel like spending $300 on a new aftermarket one, so if anyone has any tips please let me know.
  • Why the bike only took 2 quarts of oil instead of 3
  • Get luggage mounted onto the bike
  • Brakes are a tad bit spongy, but overall grab strong
  • Slight amount of play in the throttle

There are time stamps in the video if you just want to hop around (I know, it's a long video). There are some funny bloopers at the end, so I'd highly recommend at least watching those.

Hope you guys enjoy as much as I did. I also hope this might help some people who are looking to revive a Concours of their own. Some of the videos / images I came across were quite low quality, so I hope the higher definition will help a bit. I'll continue to update this thread as I come across some new findings or have any updates to give.

 
Here are a couple answers that may help.

There are 2 drain plugs in the oil pan, maybe you missed the forward one. If you drained both the sight glass is not your friend when it comes to proper oil fill, 3L or 3 qts and call it done.

You need a bit of play in the push pull cables on the throttle or they will bind, if you look at the end of the throttle grip as a clock face maybe 15-30 minutes of play, as long as it snaps back on its own. Adjust at carb linkage.

The stock windshield sux, besides the wind hitting the top of the helmet it causes buffeting with the pressure behind it. Get on the highway and go behind an 18 wheeler and pass him, to see if 100-$300 isn't worth a replacement.
Some have acquired 80-90s Goldwing windshield vent and put it in the stocker, to relieve buffeting. I cut mine down and painted black for a summer shield, that I hardly use, it feels like you have no windshield and wind against upper torso is tiring if your not used to it on long journeys. Laminar lip has been tried to change the wind pattern.

Good luck
 
Great video on the things that probably will be needed on any older bike you might buy. Unfortunately you had to redo a few thing as you got further into the project. It was good that you put them in your video to help others to see how things can progress.

Oil was the second drain plug. The sight glass works fine when you are doing the oil change. Add to the top fill line. Run the bike to do a leak check and fill the oil filter. Refill to the top line. To check in service start and run the bike for a little bit, shut it off and give it time to settle then you can use the sight glass to check. It will likely show low before you run it and look good after it is run.

A trick for the brakes is to tie the front lever back overnight. Some times it helps. I think it lets any micro air bubbles work there way to the top of the lines and then be pushed into the master cylinder when you release the lever.

With the belly faring off I use a jack under the engine to lift the front until the rear tire just touches the ground.

The cooling system has a bleed fitting on the thermostat housing.

For maintenance testing I have a small fuel tank to use to run and check for leaks, like after cooling system, valve clearance checks, or carb sync checks. Just remember to plug the vacuum line to the carb.

It looks like the bag mount antlers are not installed. I hope the came with the bags.

The throttle initial position and play is set with the adjusters at the carb connection. Loosen them both and use the close cable to set the initial position where the grip has just a little bit more travel to pull the throttle closed before the grip stop is hit. Adjust the open cable to take out as much free play without causing binding. The throttle must snap back. Check that the throttle will hit the full open and closed stops to verify the grip is set correctly

Look into Murph's Kits for C-10 parts. Great supporter of this site. I highly recommend the side panel knobs and the fuel tank quick release. These are two items that get removed often. Plus oil filters, valve adjust kits, cooling system parts, and many more items.
 
On the throttle settings. Use the knurled knob at the grip. When setting the cables at the carbs turn the knob all the way in. Then you can turn that out to make it perfect throttle snap back.

Now that I think about it since it's been some time since I've set the throttle maybe I have the above bass ackwards?? Regardless....that knob is useful.
 
Leave it to me to make a post and then disappear for a while. Lol.

Anyway, thanks everyone for the tip on the two drain plugs. I must've missed this somewhere in the manual. When I change oil in a few months I'll be sure to drain from both spots.

On the point of the luggage mounts, those did in fact come with the bike. One of them is broken, so I need to figure out if I can weld / fasten it back together somehow. Have been a little lazy on that.

For the windscreen, I need to ride around a bit more to see how bad it is. I'd probably be down to try the goldwing grille replacement instead of chopping up / replacing the original windscreen. Maybe a smoke study would be pretty cool.

This bike gets hot, like really hot. The guy previously installed a switch to turn the fan on which helps a little, but I'm wondering if that then makes it so the fan doesn't auto kick on. I'll have to test it.

Also, the bike seems to have an odd throttle response. I give it maybe 10% throttle and it moves, but once I give it more throttle it's like it finds 20 extra horsepower and it takes off. I don't think (I hope) nothing is clogged, so not sure if this is just a characteristic of the bike.

I'll probably do some updates in another video if anyone is interested.
 
On the point of the luggage mounts, those did in fact come with the bike. One of them is broken, so I need to figure out if I can weld / fasten it back together somehow. Have been a little lazy on that.

The luggage mounts, we call 'em 'antlers' can be welded if you have all the pieces.

This bike gets hot, like really hot. The guy previously installed a switch to turn the fan on which helps a little, but I'm wondering if that then makes it so the fan doesn't auto kick on. I'll have to test it.

I bet the PO did that because the coolant fan switch (part no: 27010-1202) mounted on the left side of the radiator failed.

The test to check if its a bad fan or switch is to remove the wire leads and jump them together - it should turn on the fan.

If not, fan is bad. If fan runs, you have a bad 27010-1202 switch.

You already know the fan runs so you're probably good there.

ZG1000 uses same temp / sensor switch as the 1991 Honda Civic DX.

Additional part number sources:

ACDelco: E-1858
Auto Tune: PT2628
Beck/Arnley WorldParts: 201-0817
Beck/Arnley WorldParts: 201-1369
Borg Warner: TFS500 (Tom Masterson)
Echlin (NAPA): FS-130
Facet: FS8404 (Chris Roy)
Filko: TFS-1 (Bob Chappell)
Four Seasons: 35934 (Bob Chappell)
G.P. (?): 40-5001
Kem: TW-65
Mitech: TS-84
Motorcraft: no interchange
Niehoff: WA-639B
Standard: TS-84
Wells: SW504 (Guy B. Young II)
 
Last edited:
I watched the (entire) video! Very nicely done. On "Brakes are a tad bit spongy", if not already done, you might consider replacing the OEM brake lines with steel-braided lines to remove brake-line flex. I've seen it mentioned that that behavior could be from the original brake lines flexing a little - especially if riding in hot weather...just a thought.
 
I watched the (entire) video! Very nicely done. On "Brakes are a tad bit spongy", if not already done, you might consider replacing the OEM brake lines with steel-braided lines to remove brake-line flex. I've seen it mentioned that that behavior could be from the original brake lines flexing a little - especially if riding in hot weather...just a thought.
Great suggestion! I replaced the stock lines with Gaffer stainless units. My 09 C14 sat in a Texas garage for roughly 6 years when I bought it. I was concerned that the rubber lines might not be robust anymore making my decision for the upgrade. I can stand her on the front wheel with 1 finger if I wanted to do so. Great feel and I have confidence that the brakes will always be there.
 
Ok, so quick little update after riding around a few months.

I bought this wind deflector to put at the top of the stock windshield, and it has made a world of difference for me. It's not perfect, but it's pretty close.


The next thing that I wanted to ask everyone's question and opinion on is why this bike seems to run so incredibly hot when I'm riding? It's honestly really bad, arguably the hottest motorcycle I have ever written. For background, I'm talking about riding in between 80 to 90 degree weather with maybe 30 to 40% humidity. The temperature gauge will frequently climb to about half scale when slowing down for going at low speeds, and tends to go even higher when I'm in stop-and-go traffic. I have never really gotten the temperature indicator to go right to the first line on the thermostat. I feel like the coolant reservoir has enough coolant in it, as well as the fill port up by the top of the radiator, but I could be wrong. I have done a lot of reading on this forum and other forums in terms of this bike being hot, and it seems to be a pretty common issue. The bike is incredibly comfortable and fun to ride, but this overheating issue is honestly making it my least favorite bike to ride. I can see really enjoying it during the cold winter months, but any other time it's truly uncomfortable trying to ride it. Any thoughts or tips?
 
The next thing that I wanted to ask everyone's question and opinion on is why this bike seems to run so incredibly hot when I'm riding? It's honestly really bad, arguably the hottest motorcycle I have ever written. For background, I'm talking about riding in between 80 to 90 degree weather with maybe 30 to 40% humidity. The temperature gauge will frequently climb to about half scale when slowing down for going at low speeds, and tends to go even higher when I'm in stop-and-go traffic. I have never really gotten the temperature indicator to go right to the first line on the thermostat. I feel like the coolant reservoir has enough coolant in it, as well as the fill port up by the top of the radiator, but I could be wrong. I have done a lot of reading on this forum and other forums in terms of this bike being hot, and it seems to be a pretty common issue. The bike is incredibly comfortable and fun to ride, but this overheating issue is honestly making it my least favorite bike to ride. I can see really enjoying it during the cold winter months, but any other time it's truly uncomfortable trying to ride it. Any thoughts or tips?
What you are describing sounds normal. First make sure your radiator fan does comes on - that's important in stop and go traffic.

The fairing can be a heat magnifying megaphone especially at your lower legs. I find riding pants are cooler than riding without (and are better protection in case of a get off). My lovely wife sewed heat reflective pot holder material in the shins of the mesh riding pants which works well.

It helps to put your feet on the outer ends of the foot pegs. Also helps not to hug the tank with your knees but to get them out towards the lower fairing edges.

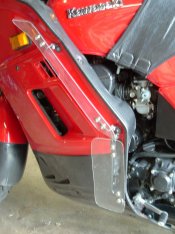
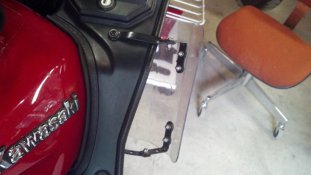
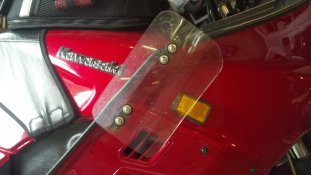
Another thing you can do is add some air wings which bring some cool air into the mix. Due to the pivot, when closed they can make the bike seem to have a heater when its cold.

I have fabbed 2 iterations, the 2nd was more effective, (I think because of the wider wing and the double bend), and what I have run for years. If I did it again, I'ld make them a bit lower to focus more on cooling the air out of the lowers.


DSCF0013.JPG


2012-08-09_11-57-47_122.jpg
2012-08-09_11-56-56_210.jpg
 
Last edited:
If you have the parts to the antler that is broken it can be welded.
But, note that it is cast aluminum that requires some finesse to get a good weld.
I also suggest cutting small pieces of aluminum and welding them over the repair (in the web area) .
Adds a LOT of strength.

Suspect your carbs need a little attention to improve the abrupt power change.
Steve's 2 minute Jett kit does wonders.

Ride safe, Ted
 
Top