
-
WOULD YOU LIKE TO BE ABLE TO POST?
You must have an active membership plan
Use the bottons upper right to Log in or Register for membership - or click here to register to join COG
All new registrations are completed and authenticated using the club's main webpage.
For instructions to convert to one of our Full memberships from the Trial membership, click here
-
Can't post after logging to the forum for the first time... Try Again - If you can't post in the forum, sign out of both the membership site and the forum and log in again. Make sure your COG membership is active and your browser allow cookies. If you still can't post, contact the COG IT guy at IT@Concours.org.
You are using an out of date browser. It may not display this or other websites correctly.
You should upgrade or use an alternative browser.
You should upgrade or use an alternative browser.
What have your done to your C14 today
- Thread starter COGnosticator
- Start date
I rode it for the first time yesterday.
Was this the first time you "ever" rode the bike?
Need more info on the bike...……
Welcome to the COGdom!
Ride safe, Ted
Was this the first time you "ever" rode the bike?
Need more info on the bike...……
Welcome to the COGdom!
Ride safe, Ted
I picked up a 2015 Black C14 with 8990 on the clock yesterday morning. The PO had installed a Kawi top case, 2" risers, Snake Skin tank protectors, Michellin RP4 GTs and provided an extra main fob and a bike cover. The PO also installed the battery tender lead and heated gear lead. The dealer said they've sold several bikes for the guy and he's very meticulous. It shows, not a scratch or scuff on it. Tires look new with the rear being a 55 aspect ratio, so the speedometer is pretty accurate.
Pretty happy with it for $10k (with tax) out the door of the consignment dealer. Dealer is well establish and has a 5 star Google rating (146 reviews) but has a no test ride policy... Assume that is because of the consignment aspect and not owning the bikes.
So, no, I did not test ride this particular bike before the purchase. But, I have done a couple of C14 test rides this year and really like the bike.
D*mn, it rides nice!! Can't wait to get it up into the foothills west of Denver! :motonoises: :motonoises:
Leo
MtnRider; Great!
Welcome to the COG.
Come ride with us...
Ride safe, Ted
Welcome to the COG.
Come ride with us...
Ride safe, Ted
Eric said:Canyon cages were down the list of things I want to add, but after almost dropping it twice already I think they're moving up near the top!
Should be almost the first thing added to a C14
gsun said:Matthew said:I tried to take the front wheel off for a tire change but had a huge fail. I was able to remove three of the bolts for the two calipers, but the forth one is stuck. stripped out, broke off an easy-out inside of it. Don't know what to do know, that bolt is shaped so that you can't get a vice grips on it.
Can you grind flat spots in the head so you can get vice grips on it?
The head of the bolt is kind of like an acorn nut, so you can't really get a vice grips on it. I tried drilling the head off, like one does to remove rivets, but it was impossible to drill through the hardened steel of the easy out that had been further work hardened by attempting to drill through it. What I ended up doing was getting more aggressive with the dremel tool and cut a slot all the way down to the shank of the bolt, then was finally able to use the impact screwdriver with the largest slotted tip I could find to get it loose. I was about to just cut off the caliper and just buy a new one, but luckily I didn't have to. When it came to removing the axle, that was also retard tight too and had a bit of a struggle getting it to break loose, but I was able to get it. Now to remove the old, crusty tire!
Egodriver71 said:Eric said:Canyon cages were down the list of things I want to add, but after almost dropping it twice already I think they're moving up near the top!
Should be almost the first thing added to a C14
+1 :great:
Installed LED headlight and city light bulbs. https://www.amazon.com/gp/product/B07FCD3CRN/ref=oh_aui_detailpage_o00_s00?ie=UTF8&psc=1
Pinned the bags and added Grab On foam grips. Hope the added diameter will help with some arthritis in my hands. The bigger grips on the old Nomad didn't bother the arthritis.
Yeah, I've been planning the things I wanted to do to the bike right away well before I bought it.") :beerchug:
:beerchug:
Yeah, I've been planning the things I wanted to do to the bike right away well before I bought it.
:beerchug:MtnRider said:Installed LED headlight and city light bulbs. https://www.amazon.com/gp/product/B07FCD3CRN/ref=oh_aui_detailpage_o00_s00?ie=UTF8&psc=1
Do you have a pic of your install from the rear?
I measured the amount of dust collected on mine. :'(
All:
New Michelin Pilot Rd 4 tires on my 2013 C14. Second set, this set going 15k and still probably 1l left. Going on a 55o mile ride next week so needed new shoes. I'm not one to blast through the corners like some folks I know. But, I do go Mach 1 occasionally!
For my kind of riding, mostly freeway/highway they have been great.
Burned off lots of tread couple weeks ago at the Beat the Heat Rally in NC.
Phil
MtnRider said:I did have to cut the rubber boots to get them over the heatsinks. Just used an exacto knife at the base, about 1 1/4" diameter, nice snug fit. I haven't ridden at night with them so no report on beam patterns thou the reviews were positive in that respect.
Thanks, that's what I wanted to avoid, but it seems to work out pretty good in there
Sailor_chic said:I measured the amount of dust collected on mine. :'(
Finally rode mine into work today
Otherwise the dust was beginning to get too thick
See this thread: http://forum.cog-online.org/accessories-c14/digital-speedometer/
5
56taskforce
Guest
Guest
Installed a Copper Dawg windscreen
https://photos.app.goo.gl/hZKjAxV7RcF3UpCfA
https://photos.app.goo.gl/hZKjAxV7RcF3UpCfA
5
56taskforce
Guest
Guest
Say it isn't so... :??: hope you're ok!Tinsailor said:Does totaling one out count?
MtnRider said:I received Larry Toews front & rear fender extensions in the mail today. All mounted up and ready for the commute tomorrow. I like that the front is so long. Hoping that rear one helps keep the crap off the back end in the Colorado late afternoon rains.
The rear one helps a lot
Are you adding a relay to the horn wiring?
The 2 horns are going to pull more amps..
If interested; I found where you can buy an inexpensive harness you can use to add the relay.
NOTE: My bike is lowered and the 2 Slimline horns were a difficult fit in the stock location.
Can send photo's of how I did it {if needed}.
Ride safe, Ted
The 2 horns are going to pull more amps..
If interested; I found where you can buy an inexpensive harness you can use to add the relay.
NOTE: My bike is lowered and the 2 Slimline horns were a difficult fit in the stock location.
Can send photo's of how I did it {if needed}.
Ride safe, Ted
Thanks, Ted. Yes, they are running thru a relay. I mounted them on the left side right behind the radiator, where some mount the Rostra CC. I'll post a picture tomorrow. I've seen your photos of your installation but I I just didn't see how I could get my hands up there and do the work. : :truce:
I didn't know the wires to the stock horn are always hot. I tied the relay to one with other side of the relay to ground. So, when I turned on the ignition the d*mned things go on and stay on. :-\ :-\ :rotflmao: I'm doing a "What the....!!" :-[ :truce: I spent a half hour looking thru horn threads here before figuring out to run both sides of the relay thru both stock horn wires in series. :great: :beerchug: Anyone know why the horn is wired this way instead of one side grounded and the other on a normally off circuit?
Leo
[smg id=2032]
:truce:I didn't know the wires to the stock horn are always hot. I tied the relay to one with other side of the relay to ground. So, when I turned on the ignition the d*mned things go on and stay on. :-\ :-\ :rotflmao: I'm doing a "What the....!!" :-[ :truce: I spent a half hour looking thru horn threads here before figuring out to run both sides of the relay thru both stock horn wires in series. :great: :beerchug: Anyone know why the horn is wired this way instead of one side grounded and the other on a normally off circuit?
Leo
[smg id=2032]
Got home from a 4 day golf trip and installed the T-Rex lowering links and adjustable kickstand that arrived from Gary while I was gone. They dropped the rear 1 inch and I lowered the front forks the same (2" riser came with bike). I'm now flat footed instead of on the balls of my feet. And it's a heck of a lot easier to get my old leg & foot over the bags without scuffing them. I haven't had a chance to ride it yet but it certainly makes me feel steadier sitting on the bike in the garage.
I don't know, but suspect there's another horn relay hidden somewhere in the stock arrangement,that keeps the horns off until the button is pushed to close the circuit and the (hidden) relay fires the horns.
When I upgraded mine, I tied a relay into the stock wires and it works fine.
When I upgraded mine, I tied a relay into the stock wires and it works fine.
5
56taskforce
Guest
Guest
Replaced the mirrors the mirror stay and front upper fairing that was damaged in my accident. This required disassembly of the entire fairing, it's amazing how much stuff can be in there I found the key I had written off and Hardware that must have been dropped in there by Kawasaki during the original assembly????
At 4AM I decided to top off my coolant reservoir which was very low using the technique MOB and others here discussed. What a God send! So easy to do and with the veterinary syringe I was given years ago it only took a few squirts and not even 1 drop hit the floor. All ready for a 4 day solo camping ride in one week!
Oil change to Rotella T6 and new batteries in both transponders
No ridey today because of Gordon
No ridey today because of Gordon
I had a new PR4GT installed on the rear. The stock tire "found" a small staple and no shop in town would put a patch in it. I considered plugging, but since I may occasionally, slightly, exceed the speed limit it's not worth the risk. I also had no idea how expensive tires would be. After the $40 install fee (I pulled the wheel and brought it in) and taxes it was $260! Hopefully this one doesn't find any sharp objects for a long time.
5
56taskforce
Guest
Guest
Put a cover on it and drove the cage to work today. Only posted because I usually ride so she got a rest today.
I have been trying to figure out how to mount highway pegs to the Top Block Racing (TBR) that I bought from Murph's awhile back. I have been very happy with the TBRs. Have not had the misfortune to test them in a tip over, but they sure do look like a part of the bike. Ended up machining the actual blocks which are made from Delrin. Delrin is easy to machine using a table saw or router mounted in a table. Had to get some spacers and longer M10 1.25 x 60mm vs the 50mm that come with the pegs so that the pegs would clear the TBRs when folded up. Once mounted I found that when opened they canted forward not just looking funny but not providing a secure footing. I drilled and tapped the pegs close to the pivot point and used set screws and Locktite red to hold the screws in place, adjusting them until I got the best angle for my feet to rest on. I am happy with the install, the pegs are not too far forward and for my height, 5'9" they place my legs and knees in a comfortable position. We will see how they hold up on rides. You may notice that the bike is "dirty." We finally got some rain in Seattle and I have not cleaned it up yet.
If you have TBRs and want to mount pegs like these, PM me and I can send along the full set of photos and some short instructions on how to do it.
Safe Riding!
Gilbysan
If you have TBRs and want to mount pegs like these, PM me and I can send along the full set of photos and some short instructions on how to do it.
Safe Riding!
Gilbysan
Attachments

markpgavin
Tricycle
I just picked my 2012 up from Lloyd's Performance Motorcycle Center in Apple Valley, MN.
Major service tune:
Every possible item removed/cleaned/greased/adjusted
Valve adjustment
New fluids ALL around
New NGK plugs
K&N air filter cleaned and oiled
New valve cover gasket and cam position sensor o rings
New front brake pads
New tapered roller bearings for the stem
Higher weight fork oil for, ahem, higher weight pilot
Murph's lowering footpegs and bearinged-up shifter kit installed
New Dunlop Roadsmart IIIs (yes, 55) mounted and balanced
Major amounts of knowledge dropped on me.
Holy Hosannah! Rides like a new damn motorcycle again, only better because it's mine!
I can't speak highly enough about Lloyd's service. If you are in the area, or clear across the country, consider Lloyd.
Notes: https://tinyurl.com/y978mwtw
Mark
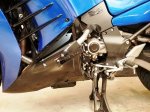
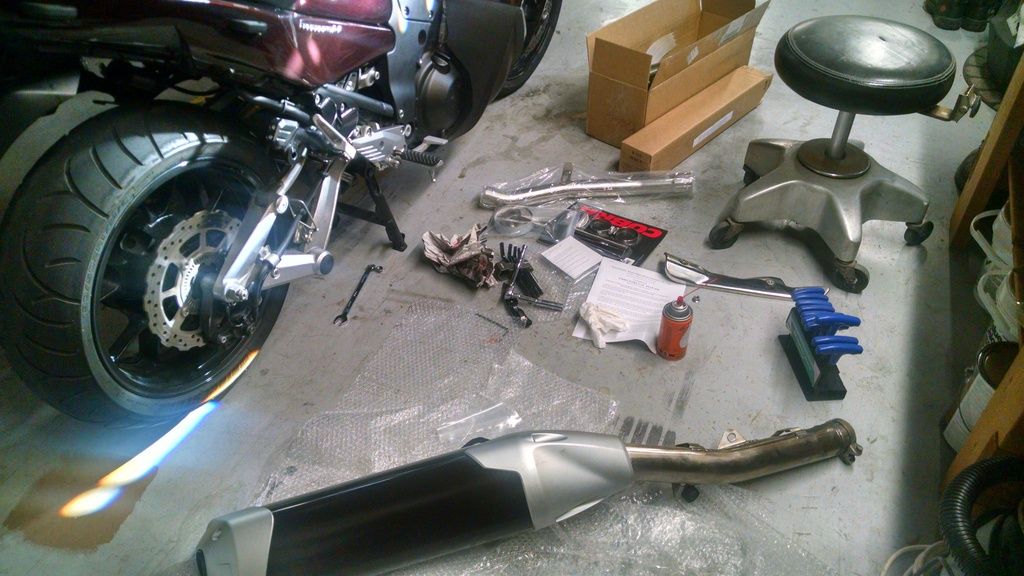
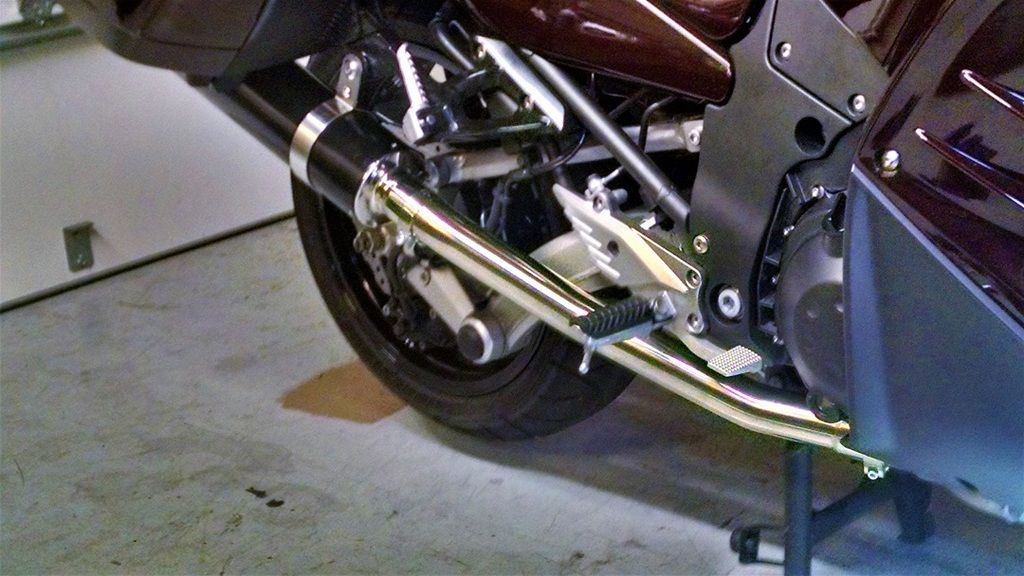
Finished installing a pair of Area P mufflers.
To build the left side, I had to modify a (right) Area P muffler and midpipe.
Really happy with the results..
Looks good, sounds good, & runs good too..
Much quieter than the Muzzy's I had on it previously.
{But, not too quiet}..
Ride safe, Ted
To build the left side, I had to modify a (right) Area P muffler and midpipe.
Really happy with the results..
Looks good, sounds good, & runs good too..
Much quieter than the Muzzy's I had on it previously.
{But, not too quiet}..
Ride safe, Ted
Been detailing mine - long over due. Got the Admore light kit done on my Givi 55. Working on doing a paint correction. I really enjoy doing that. Instant gratification! ;D
hmmm, let's see, so far I've added:
1. Pathfinder LEDs
2. PIAA Horn
3. C14 Oil Filter Protector (Murph's Kit)
4. OEM Tank Pad
5. Bracket with SW-MOTECH kit (Phil's Farkels)
6. Givi Monokey V47 Top Case
1. Pathfinder LEDs
2. PIAA Horn
3. C14 Oil Filter Protector (Murph's Kit)
4. OEM Tank Pad
5. Bracket with SW-MOTECH kit (Phil's Farkels)
6. Givi Monokey V47 Top Case
5
56taskforce
Guest
Guest
Last night after work rode to Robert (gilbysan) Gilbert's and picked up a replacement left hand bag this morning swapped the blue lid for my black lid and she is now a touring bike with proper luggage again. Thanks Robert for a great price I am very happy to have a complete bike again.
5
56taskforce
Guest
Guest
I swapped out the lock for the one off my original bag so they are keyed the same again.
The Color Right matched paint came this week so after the wife and I do some shopping I will set out to make the rest of the scratches disappear. It's a good day even if I am missing the I Hop ride
The Color Right matched paint came this week so after the wife and I do some shopping I will set out to make the rest of the scratches disappear. It's a good day even if I am missing the I Hop ride
Had the original OEM tires replaced with Michelin Pilot Rod 4 GTs. Holy cow what a difference
5
56taskforce
Guest
Guest
Put the fairing extensions back on for winter. Got cold yesterday 34° on my ride to work
Suspension adjusted at Maximum Performance & Handling in Ohio.
Great!
Great!
spartan1984 said:Had the original OEM tires replaced with Michelin Pilot Rod 4 GTs. Holy cow what a difference
I can just imagine the smile on your face...
Don't jump on me for an oil thread, just interesting.
Changed oil after 5K easy miles, mostly freeway. Note: this oil change I used a Kawasaki oil filter and even after 5k the oil looked much better than my other oil changes and usually would do at 3-4K. The oil still had a slight "golden appearance". Been using K&N 303s? that I got a deal on long time ago. I use Rotella T6 oil, have on my bikes since 2003. Really noticeable difference in the oil this change. Could the Kawasaki filter be much better?
Changed oil after 5K easy miles, mostly freeway. Note: this oil change I used a Kawasaki oil filter and even after 5k the oil looked much better than my other oil changes and usually would do at 3-4K. The oil still had a slight "golden appearance". Been using K&N 303s? that I got a deal on long time ago. I use Rotella T6 oil, have on my bikes since 2003. Really noticeable difference in the oil this change. Could the Kawasaki filter be much better?
I performed my first tire change and balance (front and rear). After speaking with the fine gents at Avon Tyres, I decided to try the Spirit ST's. Love em'! Major suspension adjustment that dialed in the turns with precision. Changed front brake pads, brake fluid, and clutch fluid. What a difference those made! Holy Smokes! Got my new Laam seat from Seth last week. Took a few miles to get settled into the new feel, how I put my feet down at a stop, and actually having a small bolster at the tailbone to lock you in at high speed is awesome! Feels like the seat that should have come OEM.
Radiator leak ... something (e.g., rock) damaged radiator. No radiator guard and no fender extender. Yep, sometimes we (me in this case) learn the hard way. :'(
Plan to get radiator repaired asap (hopefully this coming week), but before I put it back on I plan to add both a radiator guard AND the front fender extender. While bike it tore down, going to perform a few other things (e.g., replace air filter for one).
Plan to get radiator repaired asap (hopefully this coming week), but before I put it back on I plan to add both a radiator guard AND the front fender extender. While bike it tore down, going to perform a few other things (e.g., replace air filter for one).
Weather was nice here this weekend {almost 80*} so I invited my nephew and we took both Connie's out for a ride.
Had a great ride!! :great:
Ride safe, Ted
Had a great ride!! :great:
Ride safe, Ted
The back is feeling better so I rode Thur, Fri & Sat. :great: In the mid 50's.
Friday I rode to Performance Cycles (Centennial, CO) to see if they had any good Black Friday deals. $55 off on Olympia Airglide 5 jackets. Got one in "If you can't see me now you're an f'ing idiot" yellow. Been wanting this for 4 months.
Prep'ed a set of 14 year old PIAA 1100X halogen driving lights to put on the bike. They are really bright. They were on my WRX for 9 years so disassembled, cleaned the crud off, sanded the housings and chromed bezels down and painted them gloss black (C14 is black). Now just waiting on screws and spacers to arrive to try out an under mirror mount idea I have.
About a month ago I installed a GearBrake module. It adds a 5 light pulse then steady on feature to the brake lights and also senses when you let off the throttle and activates the brake lights the same way from engine braking. https://www.amazon.com/gp/product/B00ODR69QK/ref=oh_aui_detailpage_o03_s01?ie=UTF8&psc=1
Leo
Looks like many have been busy doing stuff to their Connies...You know, the more times you take off the plastic, the easier it becomes. Keep saying that to yourself...
I started to wire in a small Red LED on an articulated little arm on the left side controls so that at night I could more easily see the High/Low Switch and the Windshield Switch. I have found it harder to find them at night with heavy gloves on and sometimes mistake the windshield lift for the Hi/Lo or Vise' Versa.
While doing this I decided to extend the Battery ground to the Chassis back by the Tool Case so I pulled off the right access panel to get to the Battery and found that one of the ground eye leads that cross over the Battery casing and terminated on the Frame just in front of the Battery casing had broken off so, had to repair that, then ran a nice ground line back to the tool box area and anchored it under the Rear Brake res. bolt and put other grounds there as well.
Back to the LED on the left control stock- then I remembered that I had bought a couple waterproof little 12V rocker switches that I intended to wire into Accessories like the Little Red LED, the Switch would glow Red when energized.
A plug for and Posi-Cons products. I sure do like these little butt joint devices that make it easy to splice two lengths of wire of similar gauge. I cover them with Adhesive Shrink Tube once I verify all is good. Anyway, now figuring out how to nicely wire in the switch, actually two switches one for expansion for something I will inevitably will need. I made 3/4" circular holes just above the Glove box to house the switches and they have a small squared key on one side to keep the switch from spinning, so filed that in the ABS. Now I need to remember how to tire a switch in like this one, oh YouTube? Once that is done I can test again and see how my little light will function on the road, at night, in the dark.
Photos to follow.
Cheers!
Gilbysan
Soldered in the rear Tpms battery today, along with replacing the glove box lid that the PO hamfisted and broke the latch off of...was gonna replace the clutch fluid, but decided to wait until the VIN gets inspected. I’ll be blowing it apart after that to adjust valves anyways, and I’ll be able to get to the bleeder easily.
Frank
Frank
Just the usual routine, mounted up a new set of tires. :motonoises:
First post for a new member! This is a great site - a great resource while researching how to buy a C14. Picked up a 2015 with 4400 miles last week. Oh, what a machine!
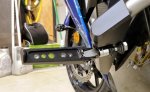
Installed an Admore 8” lightbar below the license plate today. Have had one on my BMW for the last year and enjoy the piece of mind it provides.
Installed an Admore 8” lightbar below the license plate today. Have had one on my BMW for the last year and enjoy the piece of mind it provides.
Jim said:First post for a new member! This is a great site - a great resource while researching how to buy a C14. Picked up a 2015 with 4400 miles last week. Oh, what a machine!
Installed an Admore 8” lightbar below the license plate today. Have had one on my BMW for the last year and enjoy the piece of mind it provides.
:great: Welcome to COG and enjoy that new-to-you machine; know you are and will !!!
Road Runner said:Jim said:First post for a new member! This is a great site - a great resource while researching how to buy a C14. Picked up a 2015 with 4400 miles last week. Oh, what a machine!
Installed an Admore 8” lightbar below the license plate today. Have had one on my BMW for the last year and enjoy the piece of mind it provides.
:great: Welcome to COG and enjoy that new-to-you machine; know you are and will !!!
Thank you!
Road Runner said:Radiator leak ... something (e.g., rock) damaged radiator. No radiator guard and no fender extender. Yep, sometimes we (me in this case) learn the hard way. :'(
Plan to get radiator repaired asap (hopefully this coming week), but before I put it back on I plan to add both a radiator guard AND the front fender extender. While bike it tore down, going to perform a few other things (e.g., replace air filter for one).
Leak repaired by local radiator shop for $60; a small aluminum weld job. Installed a Projekt D radiator guard and front fender extended. Coolant add, change air filter since plastic was off, put all back together and happy camper riding again. 300+ miles since leak and all is A-Ok. :great:
Evening fluid purges. Bled clutch and brakes very thoroughly, may have been original clutch fluid. (2013) Bike is completely unclothed so re torqued header bolts, looked for leaks and dribbles, none found so far but the second time I rode it after I bought it in 4/2017 it left a silver dollar sized oil spot. Never since, so suspect it had sat for a year at the PO's place and was now so happy to be ridden it spotted a little like a puppy, or the leak resealed itself. Checked the usual suspects but all is pretty clean.
Merry/Happy Birthday!!!!
Ride safe, Ted
Ride safe, Ted
While waiting on USPS to deliver my ECU from Steve after a MR reflash, I changed the final gear case oil and engine oil (Rotella T6) and filter after heating them with a heat gun. Yes, I'm impatient.... Now I won't know how much of the improved shifting is from the T6 or the MR. :rotflmao: :motonoises: :great:
Wife & daughter abandoned my on x-mas to visit friends in Illinois & I needed something to occupy some time. Was supposed to go too but need to save the vacation time for probable surgery soon. :??: ::'(
Now I won't know how much of the improved shifting is from the T6 or the MR. :rotflmao: :motonoises: :great:Wife & daughter abandoned my on x-mas to visit friends in Illinois & I needed something to occupy some time. Was supposed to go too but need to save the vacation time for probable surgery soon. :??: ::'(
Well after 3 weeks of being stripped down, the last 2 days I cleaned and reassembled for the first time the Connie. 2 broken tabs and 2 extra screws, but she is back together and I am sure the screws will sort themselves out. Hope to get her out in 6 days to ride to the local annual Polar Bear plunge.
I’ve had a lot of fun the past few weeks reading on here what are the best mods for my new to me Connie. Since the last post with the Admore Lightbar:
Murph’s risers.
Phil’s luggage rack.
Cyclops LED headlights.
LED city lights.
Pinned the side cases.
AST helmet locks.
MRA X-creen tour.
Throttlemeister friction lock.
Givi 47 arrives tomorrow.
Murph’s risers.
Phil’s luggage rack.
Cyclops LED headlights.
LED city lights.
Pinned the side cases.
AST helmet locks.
MRA X-creen tour.
Throttlemeister friction lock.
Givi 47 arrives tomorrow.
Sounds like a lot of progress and $$… :great:
Hopefully it will warm up and you can go ride it...
Ride safe, Ted
Hopefully it will warm up and you can go ride it...
Ride safe, Ted
connie_rider said:Sounds like a lot of progress and $$… :great:
Hopefully it will warm up and you can go ride it...
Ride safe, Ted
Thanks Ted!
As far as a ride,,, consider going to the COG National next year. Gonna be great!
Ride safe, Ted
Ride safe, Ted
Installed Murph's bearing up shifter bearings, just seemed like something to do. Had a very slight side to side movement in shifter. No noticeable damage/wear to OEM plastic sleeve. I do remove it a couple times a year & grease it. Shifting seems somewhat tighter now, but nothing drastic. I always upshift clutchless.
Ordered throttle cables & a fuel pump. Seems like cheap insurance since they've never been replaced. Much easier to do here than on the side of the road out of state!
Ordered throttle cables & a fuel pump. Seems like cheap insurance since they've never been replaced. Much easier to do here than on the side of the road out of state!
Jim said:I’ve had a lot of fun the past few weeks reading on here what are the best mods for my new to me Connie. Since the last post with the Admore Lightbar:
Murph’s risers.
Phil’s luggage rack.
Cyclops LED headlights.
LED city lights.
Pinned the side cases.
AST helmet locks.
MRA X-creen tour.
Throttlemeister friction lock.
Givi 47 arrives tomorrow.
Hi Jim,
Pinned the side cases, can you elaborate on that or provide the forum posting where it was discussed?
Thanks,
spartan
spartan1984 said:Jim said:I’ve had a lot of fun the past few weeks reading on here what are the best mods for my new to me Connie. Since the last post with the Admore Lightbar:
Murph’s risers.
Phil’s luggage rack.
Cyclops LED headlights.
LED city lights.
Pinned the side cases.
AST helmet locks.
MRA X-creen tour.
Throttlemeister friction lock.
Givi 47 arrives tomorrow.
Hi Jim,
Pinned the side cases, can you elaborate on that or provide the forum posting where it was discussed?
Thanks,
spartan
here ya go,
http://forum.cog-online.org/concours-14-zg1400-general-chat-and-tech/bag-pinning-re-dux/
Thank you ;D
642mirage
Training Wheels
Odometer has over 500 miles on it so first oil change (Rotella T5) and final drive oil change. Picked up some nice winter Raiden Alcan gloves (2XL) that actually fit my hand since none of the rest did. Nice to be able to keep it in a lower gear with higher rpms now. ;D
Coggers,
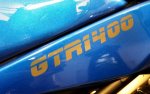
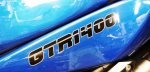
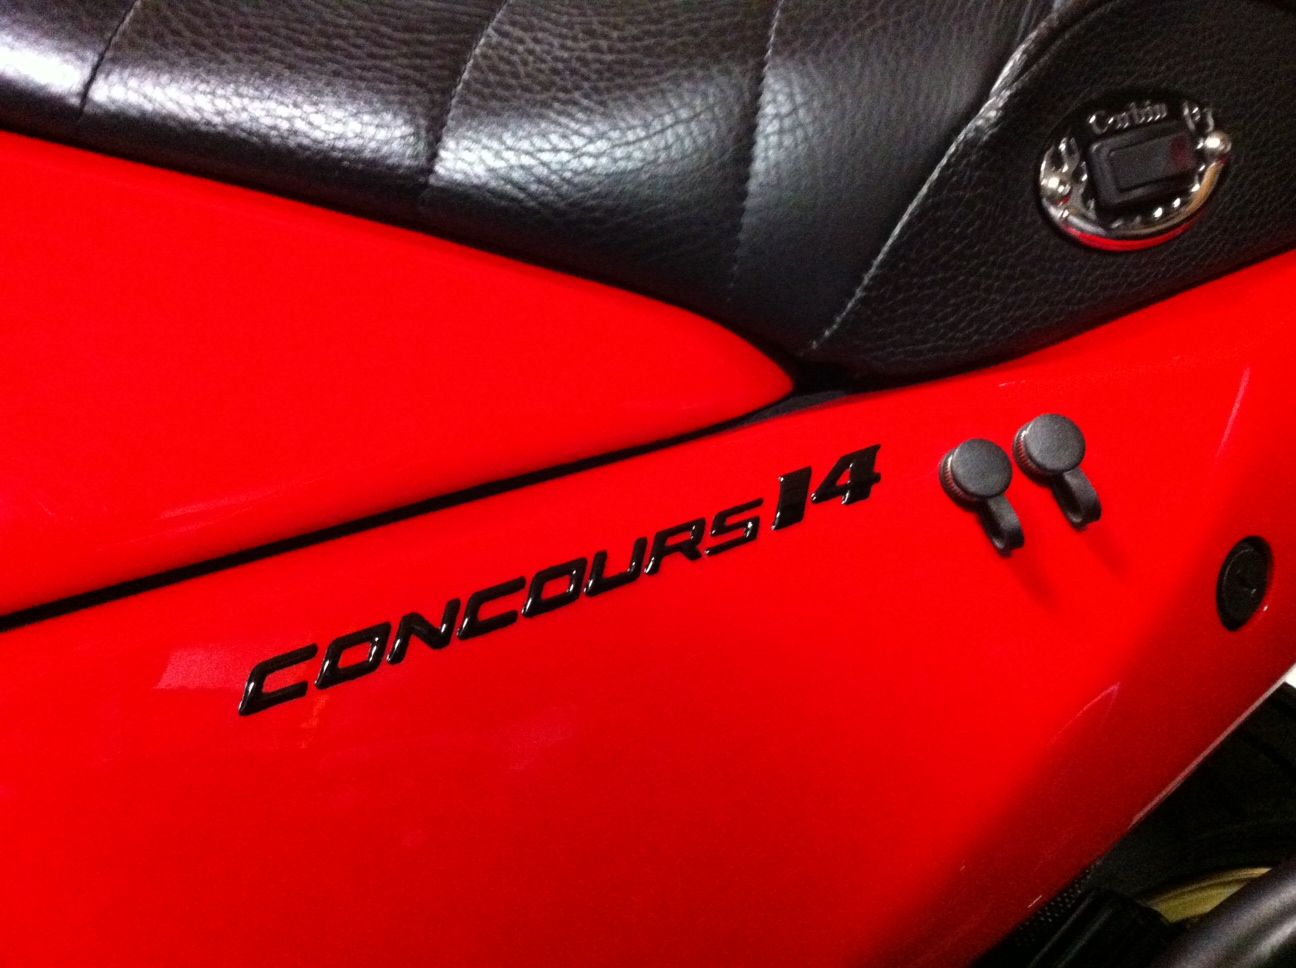
I have been working to find a Black Embossed "Concours14" or "GTR1400" emblem to replace the Chromed ones I removed when Connie was painted and it has been a challenge. I tried the Sign Specialist on the Web to make some vinyl stickers for me. First a shout out to them. The first set I received from them was not quite right according to my order notes. When I notified them, they agreed it was wrong and sent me two new sets, slightly different but now corrected. Very good customer service and their pricing was good by my ruler.
I have attached photos of the V1 original and the V2 second set. My sense is that the both V1 & V2 emblems are a bit too tall in proportion to the other stuff around it, both versions are 1" tall. The V3 set is about 7/8" tall and may look better. I have not mounted the third set yet but will get them on someday and post photos for them as well.
Also, I have investigated what are called Gel or Domed lettering. This is what are used at the factory for the emblems nowadays. Mainly they are used on Boats, RVs, trucks, etc. and come in 3" letter heights, too tall for the bike.
If anyone knows of someone who makes Gel or Domed lettering that is 1" tall please let me know.
Safe Travels!
Gilbysan
Attachments
gilbysan said:If anyone knows of someone who makes Gel or Domed lettering that is 1" tall please let me know.
Safe Travels!
Gilbysan
Really not trying to be a wise guy... Why not buy a new set from Ma Kaw and rattle can them black and stick em on? It's already been done a few times.
Here's the first one I saw....
http://forum.cog-online.org/concours-14-zg1400-general-chat-and-tech/have-you-red-about-zg's-new-passion-this-fallwinter/msg325184/#msg325184
5
56taskforce
Guest
Guest
gilbysan said:Coggers,
I have been working to find a Black Embossed "Concours14" or "GTR1400" emblem to replace the Chromed ones I removed when Connie was painted and it has been a challenge. I tried the Sign Specialist on the Web to make some vinyl stickers for me. First a shout out to them. The first set I received from them was not quite right according to my order notes. When I notified them, they agreed it was wrong and sent me two new sets, slightly different but now corrected. Very good customer service and their pricing was good by my ruler.
I have attached photos of the V1 original and the V2 second set. My sense is that the both V1 & V2 emblems are a bit too tall in proportion to the other stuff around it, both versions are 1" tall. The V3 set is about 7/8" tall and may look better. I have not mounted the third set yet but will get them on someday and post photos for them as well.
Also, I have investigated what are called Gel or Domed lettering. This is what are used at the factory for the emblems nowadays. Mainly they are used on Boats, RVs, trucks, etc. and come in 3" letter heights, too tall for the bike.
If anyone knows of someone who makes Gel or Domed lettering that is 1" tall please let me know.
Safe Travels!
Gilbysan
Rev Ryder said:gilbysan said:If anyone knows of someone who makes Gel or Domed lettering that is 1" tall please let me know.
Safe Travels!
Gilbysan
Really not trying to be a wise guy... Why not buy a new set from Ma Kaw and rattle can them black and stick em on? It's already been done a few times.
Here's the first one I saw....
http://forum.cog-online.org/concours-14-zg1400-general-chat-and-tech/have-you-red-about-zg's-new-passion-this-fallwinter/msg325184/#msg325184
Duplicolor has a rattle can paint kit that mimics black chrome. As big as the murdered out all black thing has become I still like chrome and have been thinking of doing all my badging and chrome trim on both my bike and my truck with this stuff.
No Worries! I have no ego in this project, just trying different ideas and throwing them against the wall. I may yet try the rattle can approach. I have ordered another set of decals; this one "Fat Ninja" we will see how that looks on Connie.
Thanks for all, those painted logos really do look first rate.
Gilbysan
Thanks for all, those painted logos really do look first rate.
Gilbysan
Changed oil & filter, changed differential fluid, cleaned air filter. Replaced throttle cables & gave them a good lubing. This was a bit of a pain, but not a terrible job. The pull cable had some fraying on the lower end. One job I shouldn't have to do again.
Attachments
Sent the ECU to Steve for an update.
Just learned a new method to lube cables. Thanks Cliff! :great:Just Cliff said:Changed oil & filter, changed differential fluid, cleaned air filter. Replaced throttle cables & gave them a good lubing. This was a bit of a pain, but not a terrible job. The pull cable had some fraying on the lower end. One job I shouldn't have to do again.